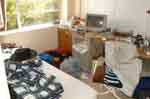
Clutter Management-How to Mount a Clutter Blitz
(Back to Page
3)
How to Mount a Clutter Blitz
Our blitz procedure should be applied one room at
a time to each room of the house. It is useful
to prepare a list of the order in which you will
tackle the different rooms. How you order the
list is up to you. As a suggestion, it is
worth doing a few easy rooms first to build some
sense of momentum and then to tackle the one or two
rooms that are the most bothersome or difficult to
keep in order.
Before you start
with a room, you should set a time limit for completing
the project and stick to the time limit. Forty-five
minutes to two hours is the time to allow per room.
Have lawn and garden size trash bags, boxes, tape, and
marking pens handy so that you have the means to quickly
remove debris and excess stuff from the room.
| 1. Quickly Sort
Through the Clutter and Throw Away all Excess
Stuff |
One of the biggest mistake people make when
de-cluttering is to mix together tidying up
and sorting through clutter. When de-cluttering,
speed of execution is very important.
The best approach is to first throw away anything
that looks like trash or which isn’t used regularly
(that is, daily or weekly). If you
start trying to tidy up and reorganize the space
before getting rid of the maximum amount of
stuff, the de-cluttering process will go too
slowly and, worse, you’ll mistakenly keep stuff
around that you don’t use very often.
|
| 2. Separate Daily/Weekly
Items from Monthly/Yearly Items |
One useful technique is to try to store
seldom used items in a different area of the
house. This may force an occasional trip
to the long-term storage area, but, it is far
easier to keep a space tidy if everything in
it is being used daily or weekly. This
one step can instantly remove clutter from a
room and quickly surface problems you may have
with owning too many special purpose clothes,
tools, etc.
|
| 3.
Put Everything Away, Making Sure that Everything
Has a Home |
Don’t create new storage, just get everything
put away as quickly as possible. In this
step, make sure that when you are done there
will be slack of 15-25% in all storage spaces,
preferably 25%. If you will not have that
much slack, then you have to get rid of more
stuff. Accept no compromise on this point.
See
Organize This Home for other ideas on organizing
storage.
|
| 4.
Now Clean |
Now that you have the trash gone and everything
put away, clean the place thoroughly.
This will flush out any remaining items that
need to be dealt with. Note:
Cleaning is step 4 in this procedure.
Resist any temptation to clean as you go
through steps 1 through 3: All that
will do is bog down the process, probably
forcing you to extend the work beyond your
initial time limit.
|
Plan for Dealing with a Large Amount of Clutter
If you have an overwhelmingly large amount of clutter
in many rooms of your house, then the above plan won’t
work because you’ll get bogged down too easily.
In that case, prior to applying the above procedure,
apply a method recommended by the
Fly Lady:
Spread the de-cluttering over a period of several weeks,
taking 10 to 20 items out of a particular room each
day. This is covered in one of her lessons, "DeClutter
15 Minutes a Day".